How to prepare the printer for extended downtime
NOTE: All the following actions can be performed by the printer operator, except the ink tubes flush. In case this action is required, it should be done by a certified service engineer.
Only follow these extended downtime procedures if the expected downtime is above 2 weeks. If the expected downtime is below 2 weeks, leave the printer (ON or OFF) with the printheads in the carriage and the carriage in the capping position.
Follow the “Printhead check and clean scheduler procedure” below ONLY if a trained operator is able to check on the printer on a weekly basis to clear any errors or replace any consumables that may be required (like Web Wipe, Ink Cartridges). Otherwise, use the “Power OFF and remove printheads procedure”.
Printhead check and clean scheduler procedure (Only available for Latex 3x00 and FW “ALTAMIRA_15_00_10.3”):
Leave the printer ON and setup the Printhead check & clean scheduler function using the following process:
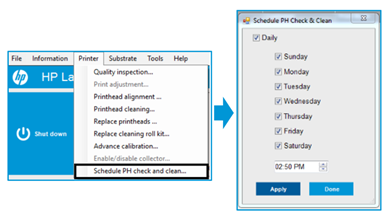
1. In the IPS menu, go to Printer > Schedule PH check and clean.
2. Select the day and time at which the servicing procedure should be triggered. It is recommended to set a minimum of two checks and cleans per week.
NOTE: A printhead check and clean will use in average of 25cc of ink.
3. Click Apply.
4. Make sure that before leaving the printer unattended for the downtime period there are no current errors in the printer. If there are, make sure to clear them before proceeding.
IMPORTANT: If the printer is left with an error, the check and clean routine will not be performed and the printheads will most probably be damaged.
Power OFF and remove printheads procedure:
1. Check that the orange printhead caps are available and the rubber is in good condition. If they are not available or the sealing rubber is not in good condition (broken or deformed), keep the printheads in the carriage and make sure the carriage is left in the capping station when turned OFF.
2. If the orange caps are available, gently clean the black sealing rubber inside with a lint-free microfiber cloth and distilled water in order to remove any dried ink or fibers that could be present. Once clean, make sure to completely dry the black sealing rubber with a dry lint-free microfiber cloth before capping the printhead.
3. In the Internal Print Server, select Printer > Replace printheads.
IMPORTANT: Make sure to remove the printheads only if the orange printhead caps are available. Otherwise the printheads will most probably be damaged. If the orange caps are not available, it is better to keep the printheads in the printer and make sure the carriage is in the capping station.
4. If the service position window is open, you are asked to close it.
5. The carriage moves automatically. Open the service position window to access it.
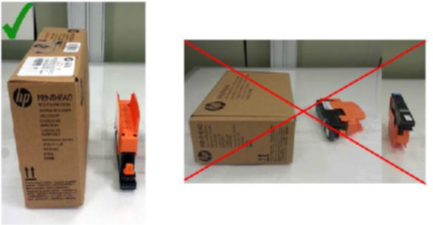
6. Carefully remove the printheads from the carriage and protect them using the original orange sealing caps. Also make sure to cover the PH needles with the orange protector rubber as shown in the following image:
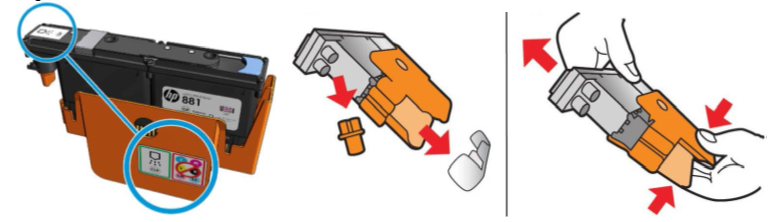
IMPORTANT: Ensure that each printhead uses its own orange sealing cap and not one from another color printhead. This is especially important with the optimizer printhead caps, as there’s a risk of nozzle damage if they are mixed with the color printheads. The optimizer caps are labeled as shown.
7. Label the original position of each printhead properly (Latex 3x00: printhead #1 to #7; Latex 1500: printhead #1 to #4).
a. To avoid error messages it will be necessary to reinsert each printhead into its original position before turning the printer power back on.
b. Store all printheads vertically in an upright position with the orange cap facing up, as shown:
IMPORTANT: Ensure that each printheads are stored with the orange caps facing upwards. Otherwise, the printheads will most probably get damaged.
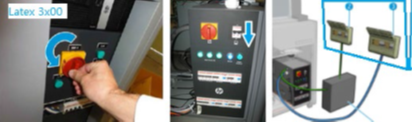
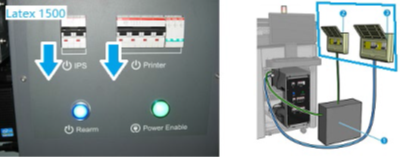
8. Click the Shut Down button on the IPS software to shut down the eBox. Wait for the message “Printer is offline”, then exit the IPS software and click the Shut Down button on Windows to shut down the IPS PC.
a. Wait until nothing is displayed on the IPS monitor before you physically turn off the switches of both the eBox and IPS PC.
b. Turn off the wall circuit breaker.
9. Disconnect all ink cartridges.
10. Disconnect all intermediate tanks but leave them in the slots.
11. Close all doors and covers.
12. Optimal conditions for the printer, ink cartridges, and printheads during shut down is from 15°C to 30°C (59°F to 86°F) and 20% to 70% relative humidity.
a. If the printer is going to be exposed to temperatures below 5°C (41°F), a certified service engineer is required to flush the ink lines from the printer.
IMPORTANT: Ensure that the removed materials are stored in the recommended environmental conditions described. Otherwise they may be damaged.
13. If the printer is going to be idle for more than 3 months, it is also recommended to flush the ink lines from the printer.