1. Ensure printer is updated with the latest firmware.
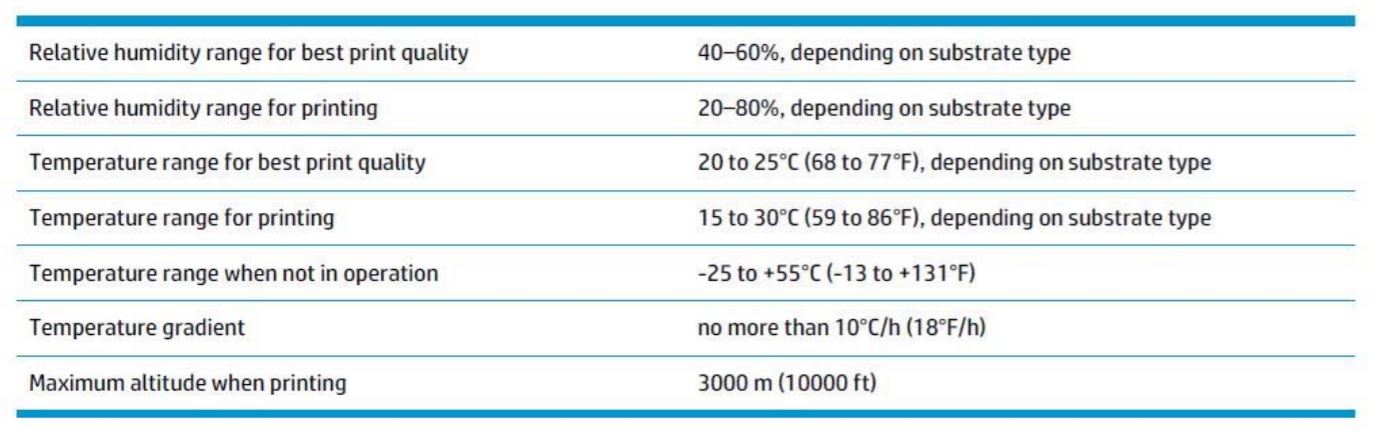
2. Environmental temperatures should be within tolerances:
3. Ensure the line sensor is clean.
- Power off the printer.
- Open Maintenance Cartridge Door beneath Touch Panel
- Pull out Maintenance cartridge and remove from printer.
- Inspect and clean the line sensor for ink deposits.
- Clean with Isopropyl alcohol and a cotton swab.
- In the image below, the line sensor is highlighted in yellow
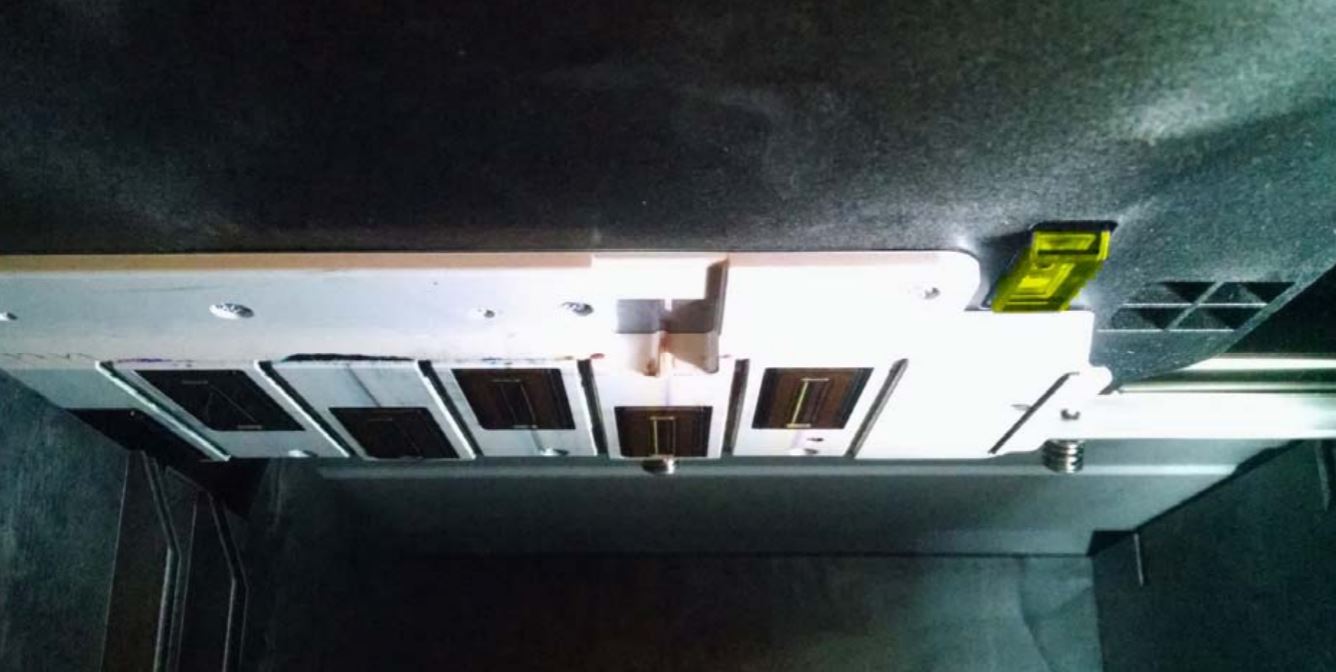
- Once accomplished, reinsert the Maintenance Cartridge and close door.
- Power on the printer.
4. Perform an Encoder Strip cleaning.
- On the control panel of the printer, go to:
- Settings > Preventative Maintenance Tasks > Clean Scan Axis Encoder
- The touch panel will walk through this cleaning task.
- Only use a water‐damp cloth for this. No additional chemicals.
5. Printhead Health:
- Clean Printheads i. Settings > Image Quality Maintenance > Clean Printheads > Clean All
- Nozzle Status Plot i. Settings > Image Quality Maintenance > Clean Printheads > Print Test Plot
- If any printhead shows signs of fatigue or failure:
- Attempt to run the Clean Printheads option for any affected printheads.
- Replace printhead(s) if unrecoverable.
6. Printhead Alignment:
- Auto Printhead Alignment
- For most applications, the auto printhead alignment results in acceptable print quality for the vast majority of production applications.
- On the touch panel, go to
- Settings > Image Quality Maintenance > Align Printheads > Auto Printhead Alignment
- On the touch panel, go to
- For most applications, the auto printhead alignment results in acceptable print quality for the vast majority of production applications.
- Manual Printhead Alignment
- For additional fine tuning of print quality or if the Line Sensor is not sufficiently calibrated, a manual printhead alignment should be used.
- On the touch panel, go to:
- Settings > Image Quality Maintenance > Align Printheads > Manual Printhead Alignment > Print Alignment Pattern
- The chart is separated into alphanumerical rows and numerical columns.
- Settings > Image Quality Maintenance > Align Printheads > Manual Printhead Alignment > Print Alignment Pattern
- For each row, choose the numerical value that visually appears most aligned.
- Although not required, a loop or magnifying glass, along with adequate lighting will assist in choosing the most appropriate value.
- Be careful of the optimizer alignment section towards the bottom of the chart. It is intentionally not cured to assist with a visual inspection.
- Once values have been chosen, on the touch panel, go to:
- Settings > Image Quality Maintenance > Align Printheads > Manual Printhead Alignment > Input Correction Values.
- Input chosen value selections here.
- On the touch panel, go to:
- For additional fine tuning of print quality or if the Line Sensor is not sufficiently calibrated, a manual printhead alignment should be used.
7. Substrate Advance Calibration:
- On Latex 360 and 370 models, the units come equipped with an OMAS camera module that assists with media advancement. For fine-tuning substrate advancement, which can assist with horizontal banding and grain print quality issues as well, a calibration can be utilized. NOTE: This calibration should be accomplished for each media being utilized. It is not a system-wide change.
- iOn the touch panel, go to
- Settings > Image Quality Maintenance > > Substrate Advance Calibration > Print Adjustment Plot.
- Once the calibration plot has printed, review each column from ‐10 to 10.
- The ideal column is the lightest of the various columns, similar to ‐6 in the example below.
- On the touch panel, go to
- Substrate Library
- Modify your media profile and desired pass mode
- Select the option “Advanced Settings”
- Select the option “Advanced Factor”
- iOn the touch panel, go to
- Depending on if the unit is set for English or Metric, the following table can be utilized to input the appropriate numerical value chosen in step 5.
- Once the value has been inputted, save the profile changes and test for print quality.
8. Run a Color Calibration for your media.
- On the touch panel, go to:
- Substrate Library
- Modify your media and desired pass mode.
- Choose to continue through the profile to section 2. NOTE: Do not print the Saturation Test Image.
- Select ‘Start Color Calibration, if it notes Recommended or Obsolete.
- Color Calibrations should be done at regular intervals to ensure color consistency in long term printing.
9. Introducing an Inter‐Pass delay into the media profile.
- Default pass modes are often 4, 6, 8, 10, etc. passes. An inter‐pass delay allows an additional delay, in milliseconds, to the movement, which can assist in correcting print quality issues and color consistency, without impacting production time that a higher pass mode may.
- On the touch panel, go to:
- Substrate Library
- Modify your media profile and desired pass mode
- Select the option “Advanced Settings”
- Select the option “Inter‐pass delay offset”
- The default value is 0.
- Input 200. The minimum value to be considered visually noticeable in print quality.
- Input 400. This value would effectively be considered a 10.5 pass mode on an otherwise default pass mode of 10.
- On the touch panel, go to:
10. Printing smaller jobs prior to printing the long run.
- By printing any smaller jobs prior to printing a longer run, the print heads have had time to acclimate to a higher temperature.
- A color shift can potentially occur when starting the long run on ‘cold’ machine, as the printheads begin printing at one temperature and throughout the print job, the printheads begin to heat up, which may cause nozzle output to vary
11. RIP Specific Settings
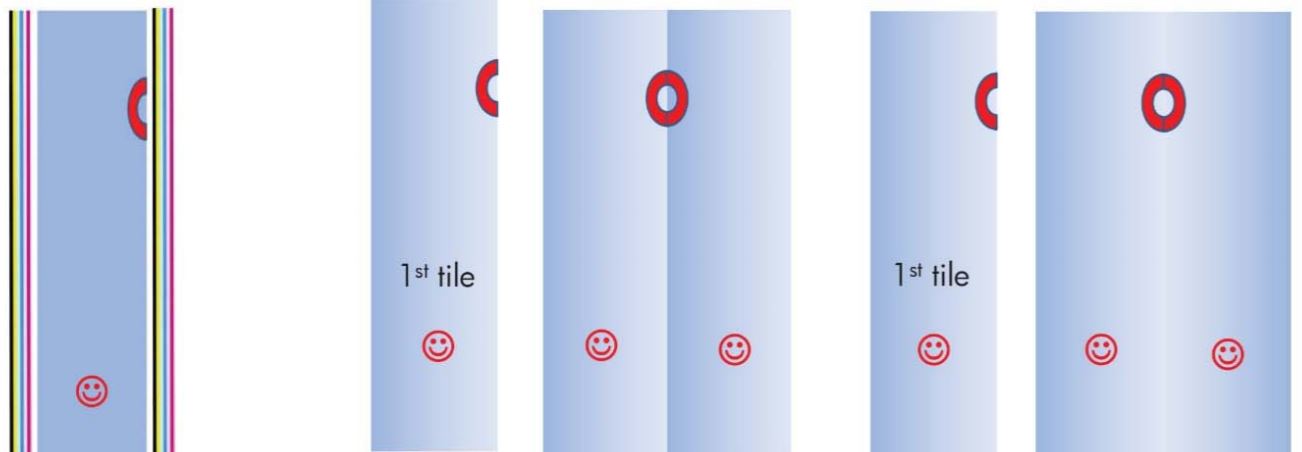
- Color Stripes/Gutter Bars/Spit Bars
- At a minimum, place a color bar on the left side of the output to maintain nozzle firing consistency over long runs.
- Flip/Alternate Panels i. This allows any L/R shift in color to ‘align’ properly when applying the substrate in its environments, such as wall coverings or vehicle wraps.
- Print Panels as separate jobs
- When printing long production runs, it can be helpful to allow the printer additional time to recover the ink system with cleaning and spitting by choosing to print each panel as a separate job. This will increase production time, however, it should also minimize color shifting