When printing in sandwich mode, you need to consider the following:
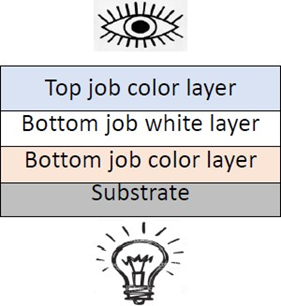
- TOP LAYER: identifies the color layer that is physically printed over all the rest. It is the layer that you can see while printing, and it covers all other layers.
- BOTTOM LAYER: identifies the image to be printed in contact with the substrate. When printing, this layer remains hidden from sight, as all other layers are printed on top of it. The file containing the bottom layer contains the white layer as well, which will be printed between the top and the bottom layers.
- LIGHT SIDE: the translucid nature of this application is usually intended to be backlit from one side and exposed to the viewer on the other. The side facing the light source is named the “light side.”
- VISUAL SIDE: refers to the image printed which will face the viewer once the application is exposed. It is opposite the light side, and is called the “visual side.”
Constraints when printing in sandwich mode:
- The two images must have the same size and resolution.
- The image you want to be in contact with the substrate (bottom layer) must have the white layer inside.
- The image you want to be in contact with the substrate (bottom layer) will always be the source of the composition. The other image (top layer) will be the one added to this one, not the other way around.
- Files ripped against a backlit category substrate are printed assuming they will be illuminated and are going to be the “light side.”
- Files ripped against a non-backlit category substrate will be those exposed to the sight of the user, thus being the “visual side”.
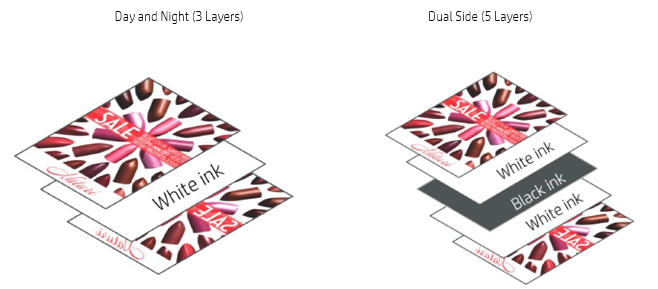
Dual Side vs Day and Night
Sandwich Mode comes with two different applications: Dual Side and Day and Night. A Dual Side application allows an image to be viewed from both sides of the transparent media equally, while a Day and Night application is designed to be viewed from one side only, and it changes if it is backlit.
How to print a Dual Side (5L) application in the R series
1. Ripping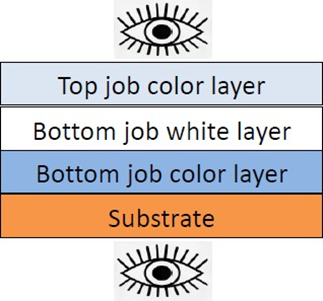
When we RIP images for a Dual Side print job, the image printed as the Bottom Layer Job (to be in contact with the substrate) must be ripped as a Frontlit Polyester Film (under the Film substrate family). The print mode should be set to Heat Sensitive White UF W260 33p 120 and it must be mirrored. The Top Layer Job is ripped as a Frontlit Polyester Film, with print mode set to Heat Sensitive White UF W260 33p 120, but not mirrored.
2. Printing in IPS
- Load the job into the IPS inbox and select Bottom Layer job in the IPS.
- Select Add Top Layer Job.
- Set the color mode to Sandwich Mode.
- Set the printing method to No Backlight.
- Set the print mode to HS Dual Side 66p.
How to print a Day and Night application (backlit from the non-printed side) (3L)
1. Ripping
When we RIP images for this kind of Day and Night print job, the image printed as the Bottom Layer Job (to be in contact with the substrate) must be ripped as a Backlit Polyester Film (under the Film substrate family). The print mode should be set to White OF W100 26p 140. The Top Layer Job is ripped as a Frontlit Polyester Film, with print mode set to Heat Sensitive White UF W260 33p 120.
2. Printing in IPS
- Load the job into the IPS inbox and select Bottom Layer Job in the IPS.
- Edit the Top Layer Job to change the substrate type to Backlit Polyester Film.
- Select Add Top Layer Job.
- Set the color mode to Sandwich Mode.
- Set the printing method to Backlight From Not Printed Side.
- Set the print mode to HS Backlit from Not Printed side 66p.
How to print in Day and Night application (backlit from the printed side)
1. Ripping
When we RIP images for this kind of Day and Night print job, the image printed as the Top Layer Job (to be in contact with the substrate) must be ripped as a Frontlit Polyester Film (under the Film substrate family). The print mode should be set to White OF W260 33p 120 and it must be mirrored. The Bottom Layer Job is ripped as a Backlit Polyester Film, with print mode set to Heat Sensitive White UF W100 26p 140, and it must be mirrored as well.
2. Printing in IPS
- Load the job into the IPS inbox and select Bottom Layer Job in the IPS.
- Edit the Job to change the substrate type to Backlit Polyester Film.
- Select Add Top Layer Job.
- Set the color mode to Sandwich Mode.
- Set the printing method to Backlight from the Printed Side.
- Set the print mode to HS Backlit from Printed side 66p.
Further information on how to print in Sandwich Mode can be accessed from the IPS help button, which will enable the user to print any job exactly the way it is meant to be printed.
How to print in Sandwich Mode in Latex 700W and 800W (3L and 5L)
Preliminary information for ONYX and Caldera:
- Side A: CMYKW
- Side B: CMYK
1. SAi
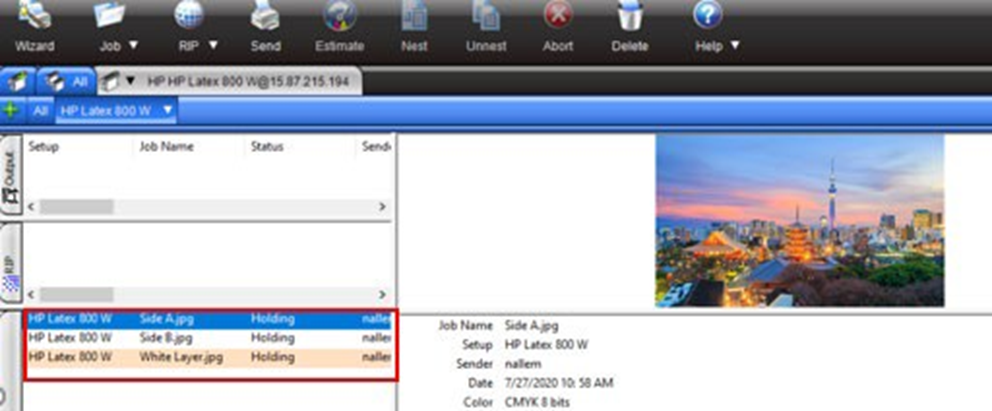
- In Production Manager, load the Side A, White Layer, and Side B jobs:
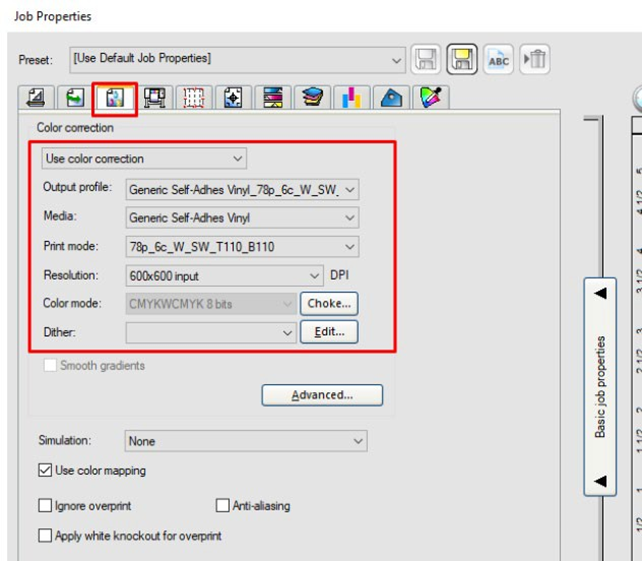
- For the Side A job, open the Job Properties.
- In the Color Management tab be sure to set the right Print mode for the Sandwich job:
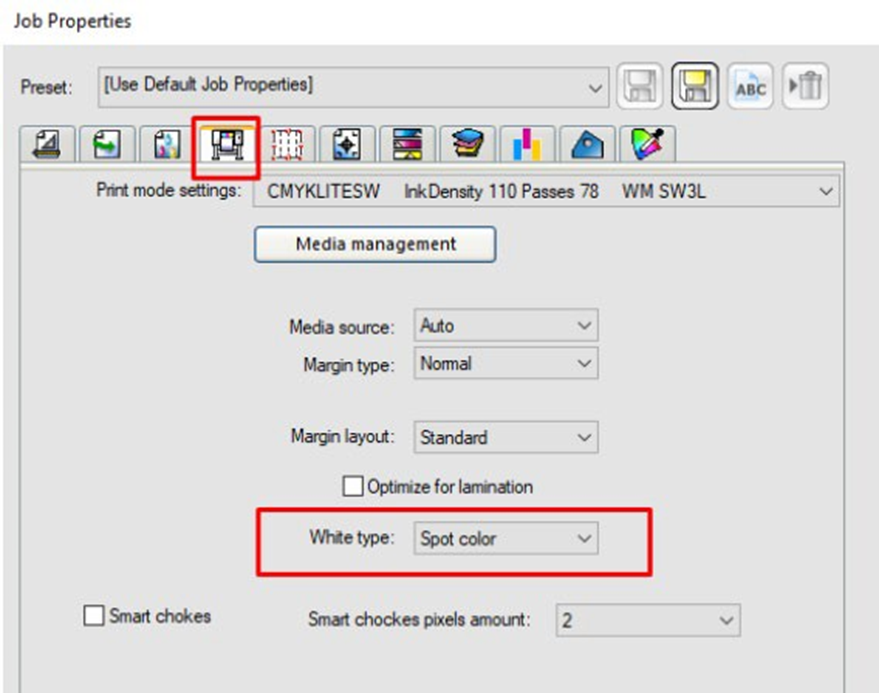
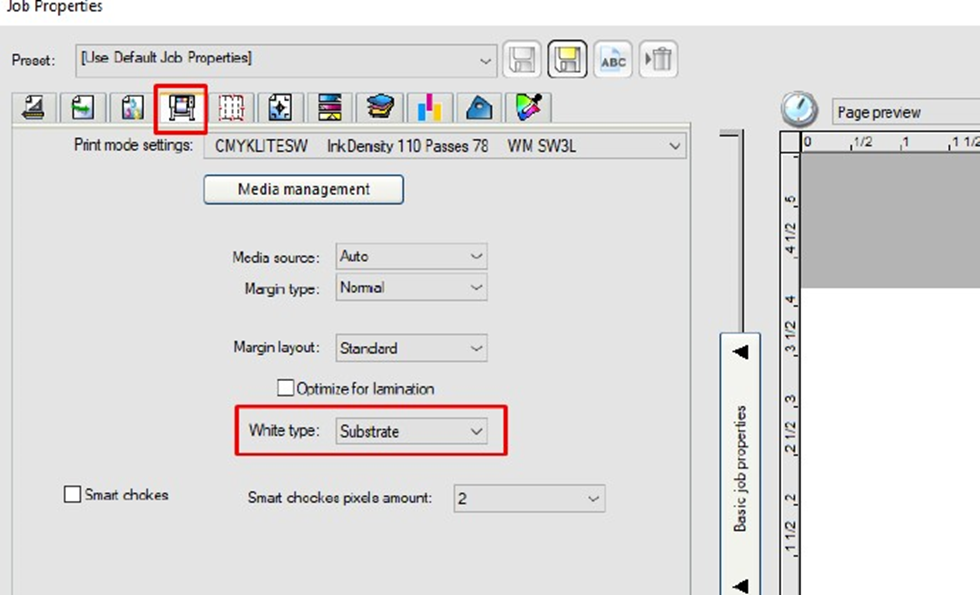
- In the Printer Options tab, set the White type to Spot color:
- Repeat steps 2 and 3 for the White layer job.
- In the Printer Options tab, set the White type to Substrate:
- Repeat steps 2,3 and 4 for the Side B job. (Side B as Spot color.)
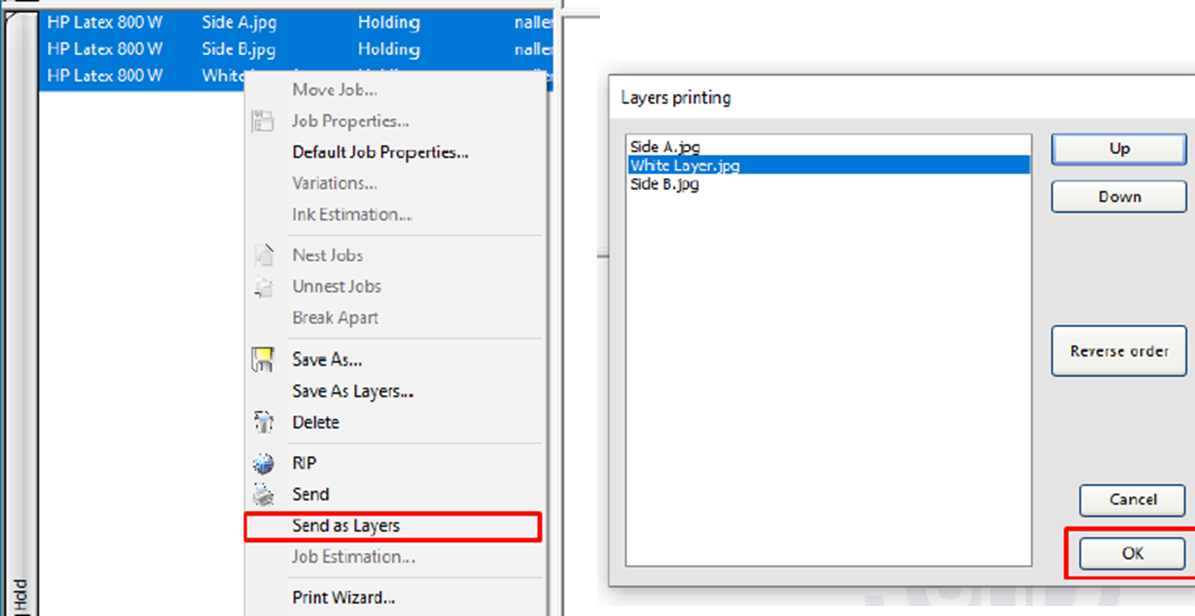
- Select all jobs—Side A, White Layer, and Side B—and select the option Send as Layers (right-click to open the menu).
- Put the jobs in the right order (CYMK+W+CMYK), and then just click Ok in the Layers printing window:
The Production Manager will first rip the 3 jobs and after it will send the Jobs to the printer (In the printer queue, you will see only one job with the name of the Side B job).
2. Caldera
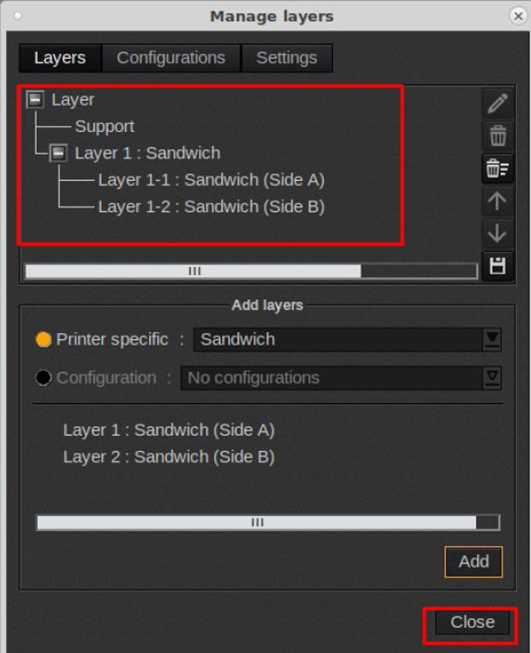
- To start the Sandwich, click on the Options (…) button.
- In the Manage Layers window, click Add:
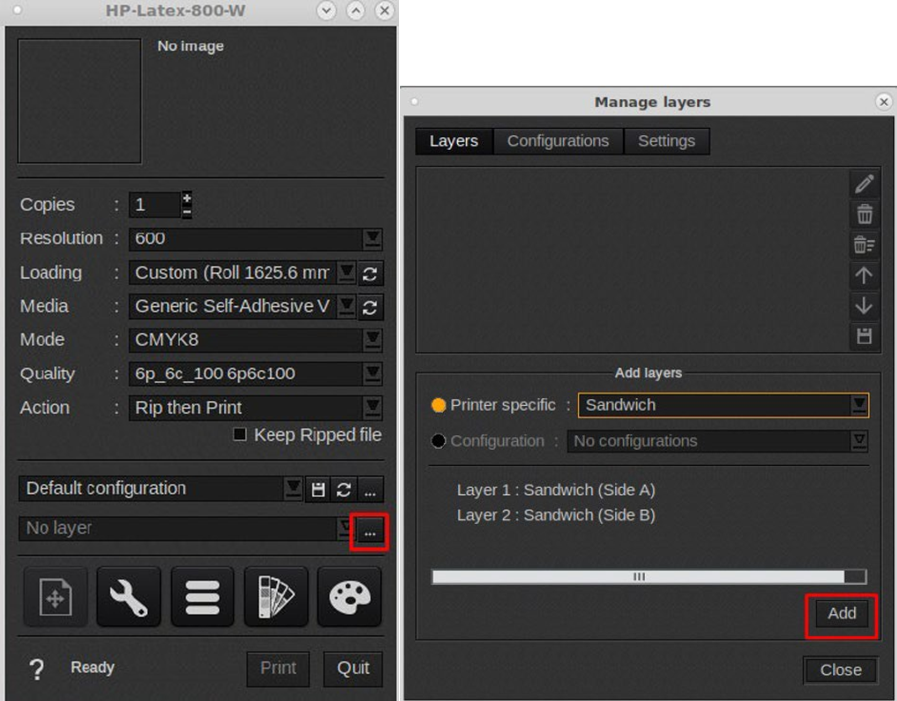
- The layer structure will now be present. Click Close:
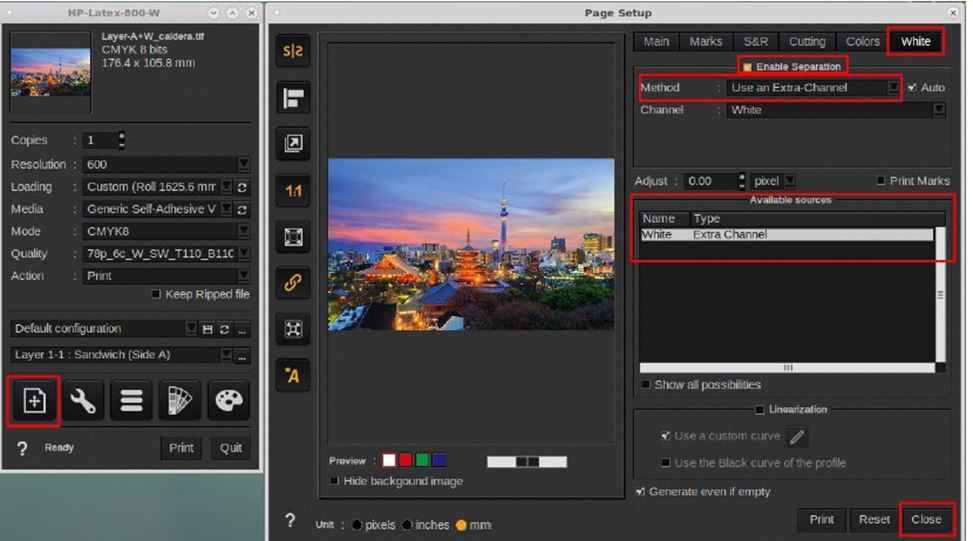
- Load the Side A image to the driver window; you will need to set the right print mode.
- Add the extra White layer to the Side A image:
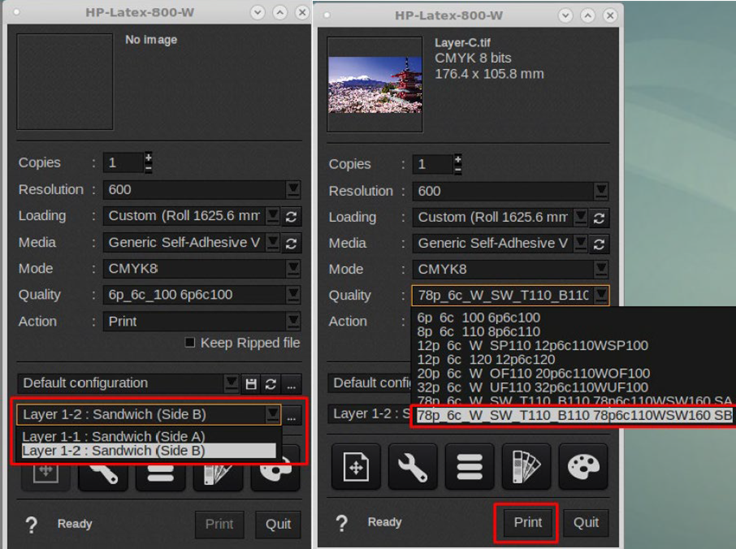
- To load the Side B image to the driver window, you need to select Layer 1-2: Sandwich (Side B) from the menu.
- Select the appropriate print mode.
- Sent to print:
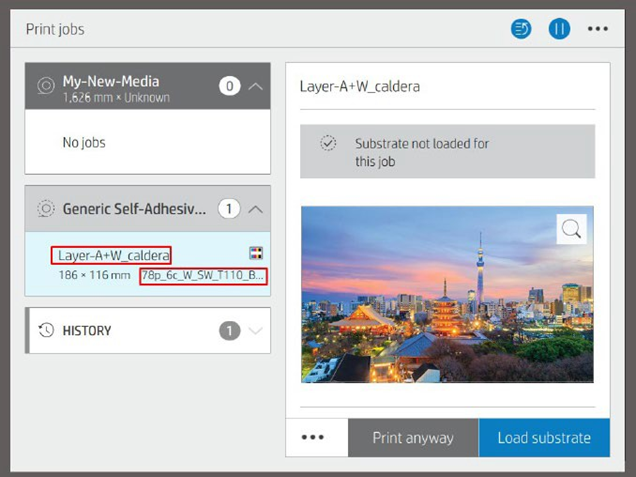
- On the printer’s front panel, you will see:
3. Onyx
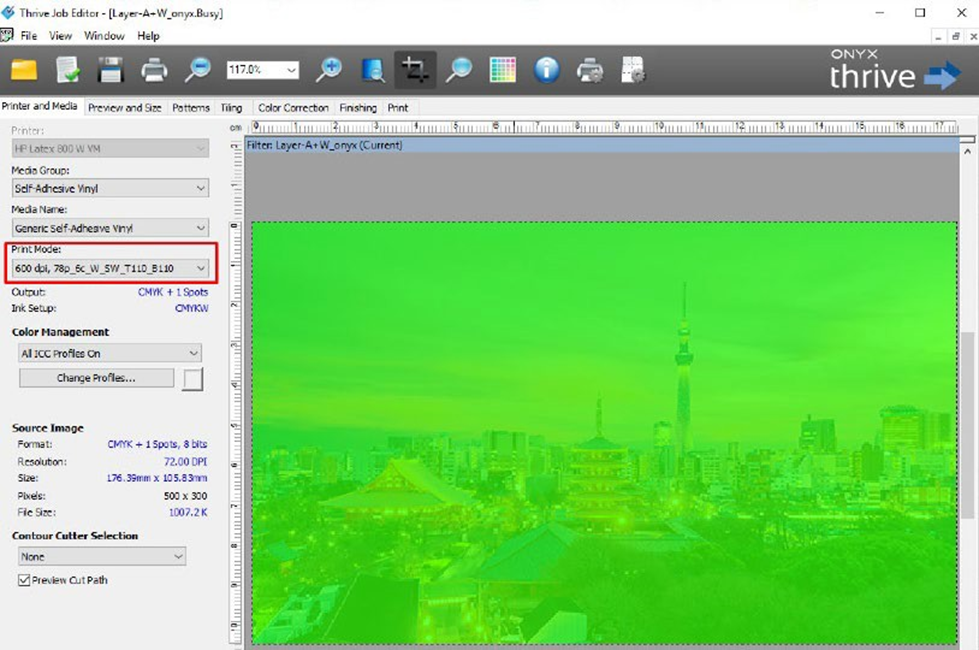
- Load the Side A job and open it in Job Editor.
- In the Printer and Media tab, set the right Sandwich print mode; the RIP will automatically detect the white layer of the job and will represent it as a light green shade.
- Go to the Print tab and press the Submit button.
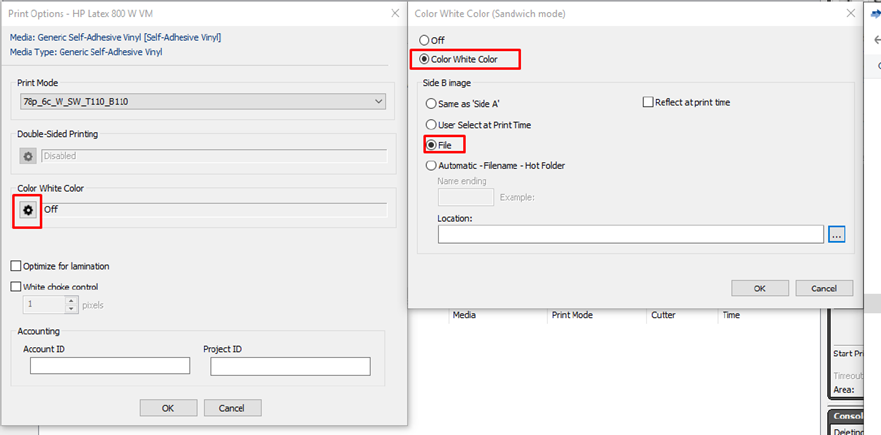
- In the Rip Queue just right-click on the job and select the option Edit and Printer Settings.
- Click the Gear button to open the Color White Color window.
- In the Color White Color (Sandwich mode) window, click first on the Color White Color radio button.
- On the Side B image group, select the File option and click the … button. In the next window, select the Side B image and click Open.
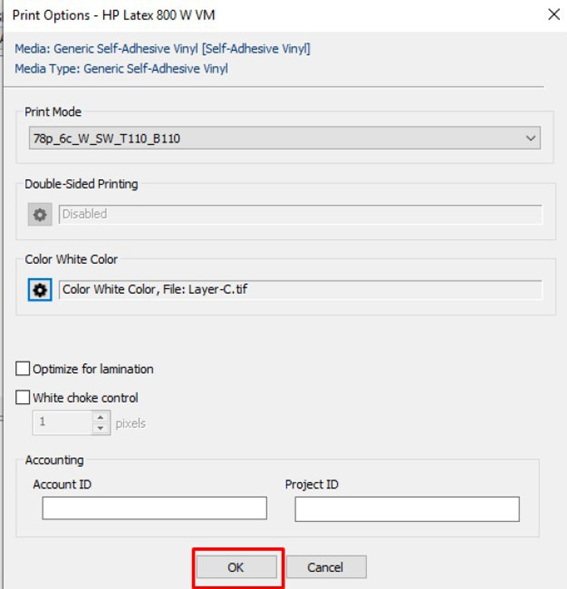
- When finished, click OK.
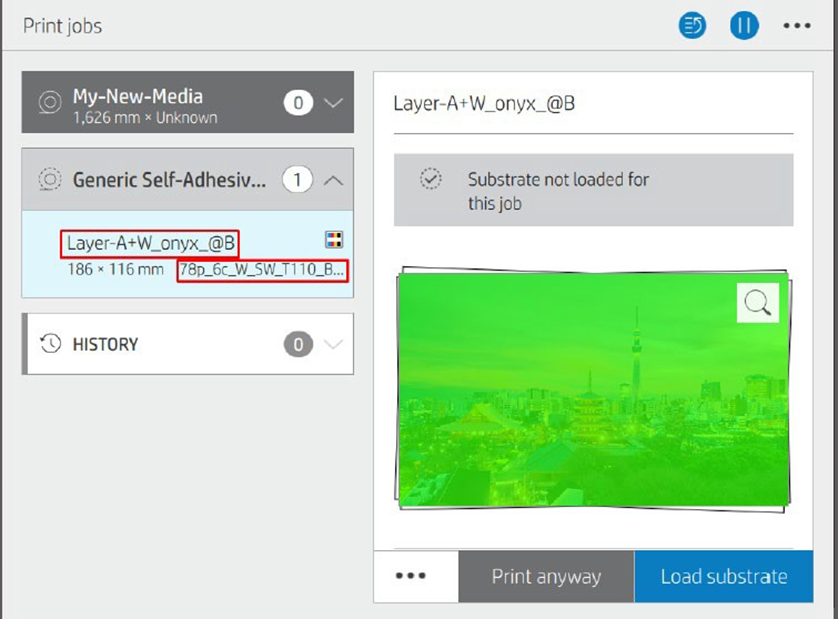
- In the Rip Queue, now just click the Print Now button. You will see that side A will be moved to the bottom of the Rip window and side B will remain on top.
- Click the Print Now button again to send side B to the printer. (The job will only be displayed in the printer queue after sending the side B job. The name of the job, in the printer queue, will be _@B).
- On the printer’s front panel you will see:

Here you can access the full White Ink Workflow Guide for the HP Latex 700W, 800W, and R Series Printers.